How to use a HC-SR04 Ultrasonic Sensor
Introduction
This is a project that uses an ultrasonic sensor with an Arduino board to measure distances and display the results on a display module. The ultrasonic sensor emits high-frequency sound waves and measures the time it takes for the waves to bounce back from an object, allowing the Arduino to calculate the distance. The end result is a device that can be used in various applications, such as robotics or DIY projects.
In this article, we will talk about how to wire and set up the module for operation with an Arduino Board.
Wiring
Most HC-SR04 modules operate at 5V and gives out digital outputs. For this project, we will be using the HC-SR04 Ultrasonic Sensor module we carry in our shop. This module consists of 4 pins:** VCC, TRIG, ECHO** and GND. Both the TRIG and ECHO pins can be connected to any Digital output pins on an Arduino Board.
Parts
Wiring Guide
Insert the HC-SR04 module onto a breadboard and connect the pins with male to male jumper wires
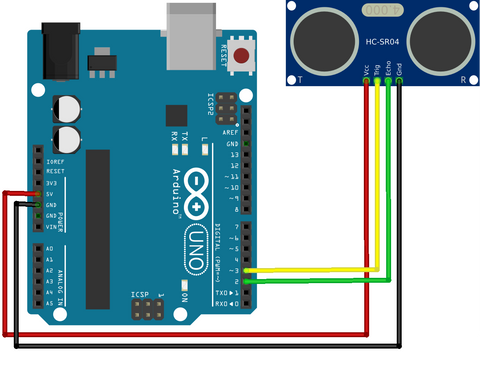
| HC-SR04 Pin | Arduino Pin |
|---|---|
| VCC | 5V |
| Trig | D3 |
| Echo | D2 |
| GND | GND |
Full Code
#define echo 2
#define trig 3

long duration;
int distance;

void setup(){
  Serial.begin(9600);
  pinMode(trig, OUTPUT);
  pinMode(echo, INPUT);
}

void loop(){
  digitalWrite(trig, LOW);
  delayMicroseconds(2);

  digitalWrite(trig, HIGH);
  delayMicroseconds(10);
  digitalWrite(trig, LOW);

  duration = pulseIn(echo, HIGH);
  distance = duration * 0.034 /2;

  Serial.print("Distance: ");
  Serial.print(distance);
  Serial.println(" cm");
}
Programming & Logic
The following code demonstrates how the ultrasonic sensor works and measure the distance if an object or obstacle is in front of it. If you want to skip the steps, you can jump to the Full Code.
Step 1: ** Define connection pins **
#define echo 2
#define trig 3
Step 2: ** Create variables for the duration of sound wave travel and for the distance measurement. **
long duration;
int distance;
Step 3: ** Set up serial communication between Arduino and HC-SR04 sensor, set the trig pin as an output and echo pin as an input. **
void setup(){
  Serial.begin(9600);
  pinMode(trig, OUTPUT);
  pinMode(echo, INPUT);
}
Step 4: ** Clear the ** trig ** pin condition **
void loop(){
  digitalWrite(trig, LOW);
  delayMicroseconds(2);
Step 5: ** Set the ** trig ** pin HIGH for 10 microseconds to generate the ultrasound. **
In order to generate the ultrasound, we need to set the TRIG pin as HIGH for 10milliseconds. This will send out a 8 cycle sonic burst which will travel at the speed sound and it will be received in the Echo pin. The Echo pin will output the time in microseconds the sound wave travelled.
  digitalWrite(trig, HIGH);
  delayMicroseconds(10);
  digitalWrite(trig, LOW);
Step 6: ** Reads the ** echo ** pin and returns the sound wave travel time in microseconds. **
duration = pulseIn(echo, HIGH);
Step 7: ** Calculate the distance. **
To get the distance in centimetre, we need to use the math formula, Time = Distance/ Speed. For example, if the object is 20 cm away from the sensor, and the speed of the sound is 340 m/s, and the sound wave will need to travel about 588 microseconds. However, the result you will get from the Echo pin will be double of the number since the sound wave needs to travel forward and bounce backward. So, we will need to multiply the received travel time value from the echo pin by 0.034 (which is the speed of the sound) and divide it by 2 (as it travels forward and backward).
distance = duration * 0.034 /2;
Step 8: ** Display the distance on Serial Monitor **
  Serial.print("Distance: ");
  Serial.print(distance);
  Serial.println(" cm");
}
Full Code
#define echo 2
#define trig 3

long duration;
int distance;

void setup(){
  Serial.begin(9600);
  pinMode(trig, OUTPUT);
  pinMode(echo, INPUT);
}

void loop(){
  digitalWrite(trig, LOW);
  delayMicroseconds(2);

  digitalWrite(trig, HIGH);
  delayMicroseconds(10);
  digitalWrite(trig, LOW);

  duration = pulseIn(echo, HIGH);
  distance = duration * 0.034 /2;

  Serial.print("Distance: ");
  Serial.print(distance);
  Serial.println(" cm");
}
Output
Serial Monitor will display the distance from the sensor to the object. In this example, I moved my hand forward and backwards to test the distance measurements.

Possible applications:
-
** Smart Home: ** Use an ultrasonic sensor to turn on lights automatically when someone enters a room.
-
** Pet feeder: ** Use an ultrasonic sensor to dispense food when your pet is near their bowl.
-
** Watering system: ** Use an ultrasonic sensor to water plants automatically based on soil moisture level.
-
** Intruder alert: ** Use an ultrasonic sensor to trigger an alarm or alert when someone approaches your home.
-
** Garage parking assistant: ** Use an ultrasonic sensor to sound an alarm when you're too close to the garage wall.
Conclusion
To conclude, ultrasonic sensors are versatile and useful tools, but it's important to understand how they work, wire them properly, and program them correctly when using them with an Arduino. Keep in mind their limitations and troubleshoot for common issues like wiring, code, power supply, distance, interference, and component damage to achieve accurate and reliable results. And don't forget to have fun!