How to use The TFT LCD Touch Screen Module for Arduino
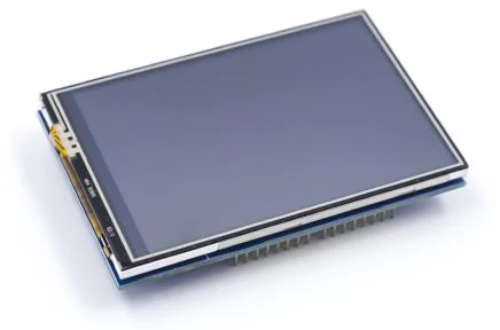
The TFT LCD Touch Screen Module for the Arduino is a version of a liquid crystal display(LCD) that uses thin film transistors(TFT) electronic that allows a user to create an interactable interface between the user and the system. As the name may suggest, this screen module has the touch screen function.
Wiring
This module is quite simple to use, due to the fact that no wires are required, all you have to do is to simply plug the display onto the Arduino Uno. Make sure that the side with more pins is being plugged into the side of the Arduino that has the numbers 0-13. In this guide, we will be using the 3.5" TFT LCD Touch Screen Module for Arduino from the website.
Parts
Wiring Guide
| Analog Pins | Digital Pins |
|---|---|
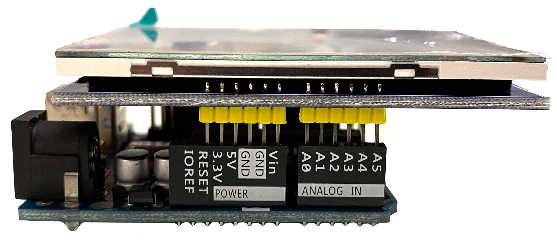 | 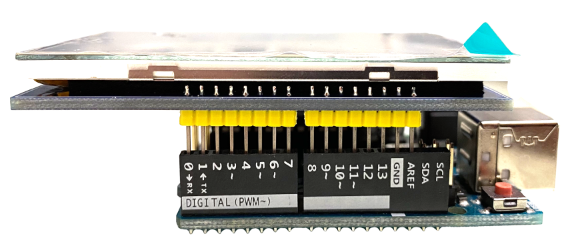 |
(Note: the pins are not fully pressed in order to show where each pin should go)
Once the pins are in place, push down until the pins can no longer seen. That is the indication that the module has been properly placed.
Programming
The following code is to demonstrate how the Touch Screen Module works, if you want to skip these steps, yuo can jump to the Full Code.
Step 1: Before we start coding, we first have to download the needed libraries.
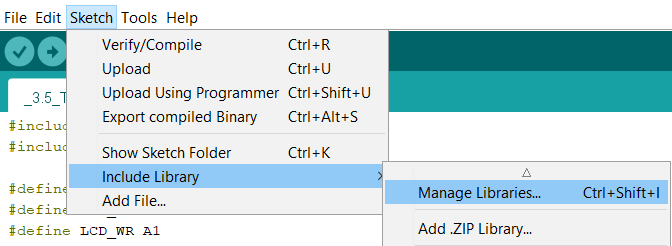
Step 2: Enter Adafruit_GFX, MCUFRIEND_kbv and TouchScreen in the search bar and install all three libraries.
Step 3: Declare your libraries.
#include <Adafruit_GFX.h>
#include <MCUFRIEND_kbv.h>
#include <TouchScreen.h>
Step 4: Declare the pins which the LCD is connected to.
#define LCD_RD A0
#define LCD_WR A1
#define LCD_CD A2
#define LCD_CS A3
#define LCD_RESET A4
(Optional) You can declare the colors with the corresponding HEX numbers.
#define BLACK   0x0000
#define BLUE    0x001F
#define RED     0xF800
#define GREEN   0x07E0
#define CYAN    0x07FF
#define MAGENTA 0xF81F
#define YELLOW  0xFFE0
#define WHITE   0xFFFF
Step 5: Create an object using the MCUFRIEND_kbv library. in this case, it is named tft.
MCUFRIEND_kbv tft(LCD_CS, LCD_CD, LCD_WR, LCD_RD, LCD_RESET);
Step 6: We can start of by setting up the screen.
tft.reset(); //resets the hardware
tft.begin(0x9486); //starts up the screen for ILI9486 IC
tft.setRotation(1); //sets the rotation of the screen
//The screen is now fully setup
Full Code
//Libraries
#include <Adafruit_GFX.h>
#include <MCUFRIEND_kbv.h>
#include <TouchScreen.h>
//Pins
#define LCD_RD A0
#define LCD_WR A1
#define LCD_CD A2
#define LCD_CS A3
#define LCD_RESET A4
//Colors
#define BLACK   0x0000
#define BLUE    0x001F
#define RED     0xF800
#define GREEN   0x07E0
#define CYAN    0x07FF
#define MAGENTA 0xF81F
#define YELLOW  0xFFE0
#define WHITE   0xFFFF

void setup(){
  tft.reset(); //resets the hardware
  tft.begin(0x9481); //starts up the screen
  tft.setRotation(1); //sets the rotation of the screen
}
Example
Here is a demonstration of the screen
Step 1: Let's start by filling the screen with your favorite colors! This will still be in setup().
tft.fillScreen(GREEN);
delay(1000); //delay is put here so that we can fully see the colors
tft.fillScreen(MAGENTA);
delay(1000);
tft.fillScreen(BLUE);
delay(1000);
Step 2: Next, let's print in the classic Hello World! on the top left corner of the screen. Note that the starting point of all objects are on the top left.
tft.setCursor(10, 10);
tft.setTextColor(WHITE);
tft.setTextSize(4);
tft.print("Hello");

tft.setCursor(150, 10);
tft.setTextColor(WHITE);
tft.setTextSize(4);
tft.print("World!");
Step 3: Finally, let's put in a blinking CAROBOT sign in the middle of the screen.
void loop(){
  tft.fillRect(80, 140, 321, 60, BLACK);
  delay(1000); //by delaying the loop for 1 second, the CAROBOT sign will be visible for one second
  tft.fillRect(80, 140, 321, 60, WHITE);
  tft.setCursor(160, 155);
  tft.setTextColor(RED);
  tft.setTextSize(4);
  tft.print("CAROBOT");
  delay(1000); //by delaying the loop for 1 second, the CAROBOT sign will be invisible for one second
}
Full Code
//Libraries
#include <Adafruit_GFX.h>
#include <MCUFRIEND_kbv.h>
//Pins
#define LCD_RD A0
#define LCD_WR A1
#define LCD_CD A2
#define LCD_CS A3
#define LCD_RESET A4
//Colors
#define BLACK   0x0000
#define BLUE    0x001F
#define RED     0xF800
#define GREEN   0x07E0
#define CYAN    0x07FF
#define MAGENTA 0xF81F
#define YELLOW  0xFFE0
#define WHITE   0xFFFF

void setup(){
  tft.reset(); //resets the hardware
  tft.begin(0x9481); //starts up the screen
  tft.setRotation(1); //sets the rotation of the screen

  tft.fillScreen(GREEN);
  delay(1000); //delay is put here so that we can fully see the colors
  tft.fillScreen(MAGENTA);
  delay(1000);
  tft.fillScreen(BLUE);
  delay(1000);
  //Hello
  tft.setCursor(10, 10);
  tft.setTextColor(WHITE);
  tft.setTextSize(4);
  tft.print("Hello");
  //World!
  tft.setCursor(150, 10);
  tft.setTextColor(WHITE);
  tft.setTextSize(4);
  tft.print("World!");
}

void loop(){
  //Blinking CAROBOT sign
  tft.fillRect(80, 140, 321, 60, BLACK);
  delay(1000); //by delaying the loop for 1 second, the CAROBOT sign will be visible for one second
  tft.fillRect(80, 140, 321, 60, WHITE);
  tft.setCursor(160, 155);
  tft.setTextColor(RED);
  tft.setTextSize(4);
  tft.print("CAROBOT");
  delay(1000); //by delaying the loop for 1 second, the CAROBOT sign will be invisible for one second
}
tft.fillRect(X coordinate, Y coordinate, Length, Width, Color);
Output
Touch Screen
If you want to use the touch screen function, the first thing you want to do is to calibrate your coordinates to make sure every thing is accurate.
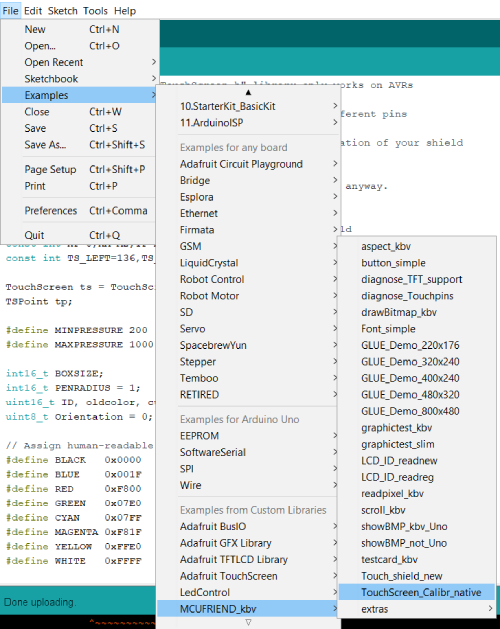
Step 1: First of all, go to File -> Examples -> MCUFRIEND_kbv -> TouchScreen_Calibr_native
Step 2: Press crtl+shift+M to open serial monitor
Step 3: Follow the instructions and tap and hold on each of the crosshairs. Once the calibration is done, now you can go ahead and copy the information from the Serial Monitor.
You're calibration is now done!
Step 4: Now go to File -> Examples -> MCUFRIEND_kbv -> TouchScreen_new

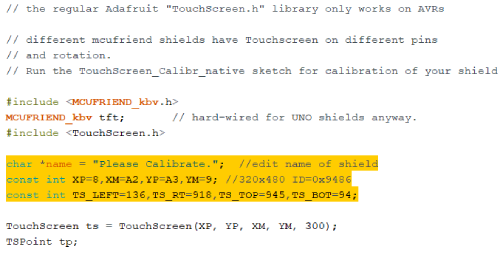
Step 5: Paste the previously copied calibration calculations here.
Step 6: Now you can upload TouchScreen_new onto your Arduino and see the magic happen.
If you press the exit button, you will be led to a drawing board where you can draw whatever you want.