Guide: How to Use the ESP-WROOM-32
Introduction
The ESP-WROOM-32 is a versatile and powerful development board based on the ESP32 system-on-a-chip (SoC). It offers Wi-Fi and Bluetooth connectivity, a dual-core processor, ample I/O pins, and extensive development capabilities. This tutorial will guide you through the process of setting up and programming the ESP-WROOM-32 board.
Materials
To follow this tutorial, you will need the following materials:
Setting up the Development Environment
- Install the Arduino IDE: Visit the official Arduino website arduino.cc and download the latest version of the Arduino IDE for your operating system.
- Install ESP32 Board Support: Open the Arduino IDE, go to "File" -> "Preferences," and in the "Additional Boards Manager URLs" field, enter the following URL:
https://dl.espressif.com/dl/package_esp32_index.json - Go to "Tools" -> "Board" -> "Boards Manager," search for "esp32," and install the "esp32" platform.
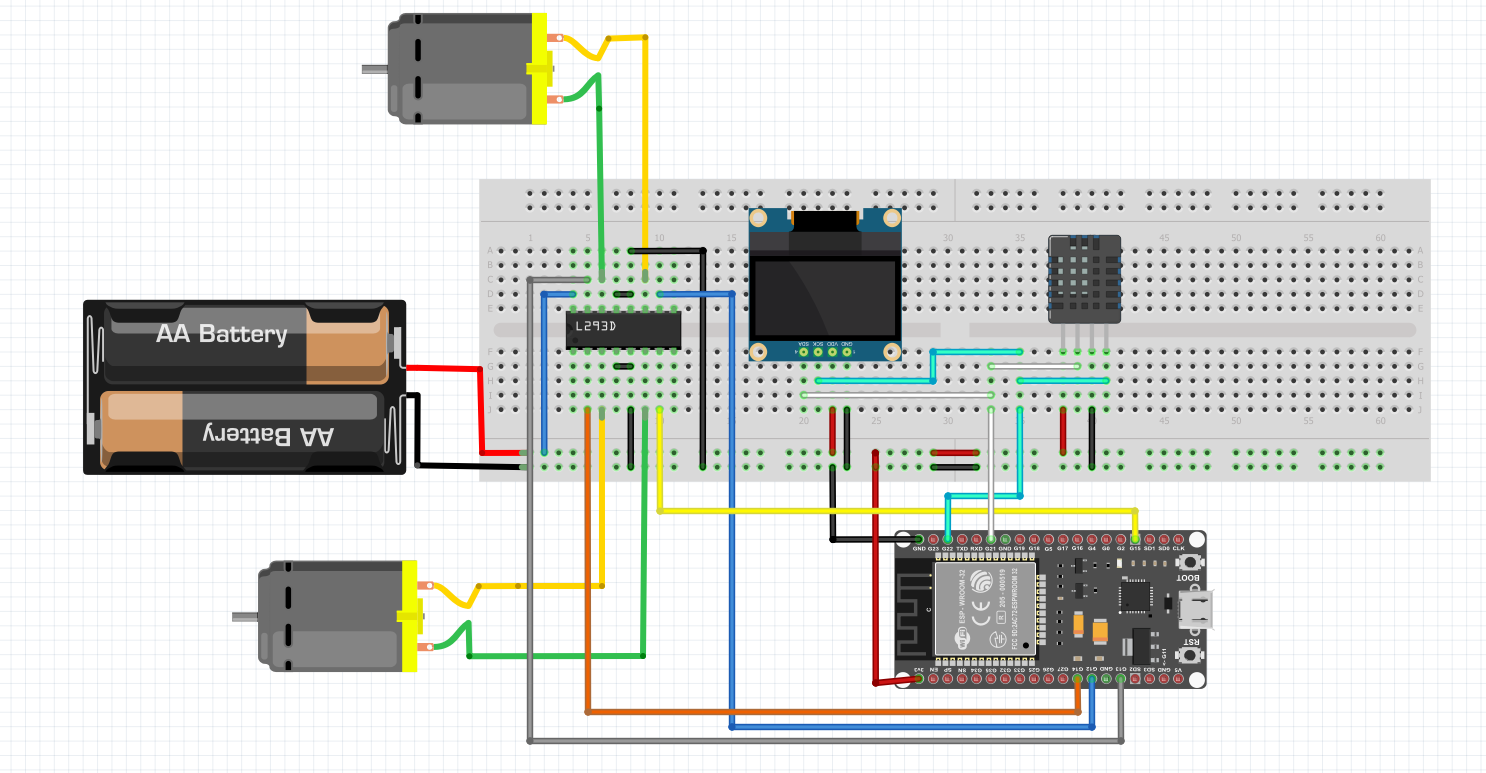
Hardware Connections
Shown below is the wire connection diagram:
- Connect the ESP-WROOM-32 module to your development board or a breadboard.
- Ensure that the usb cable is plugged into the ESP-WROOM-32 and you computer.
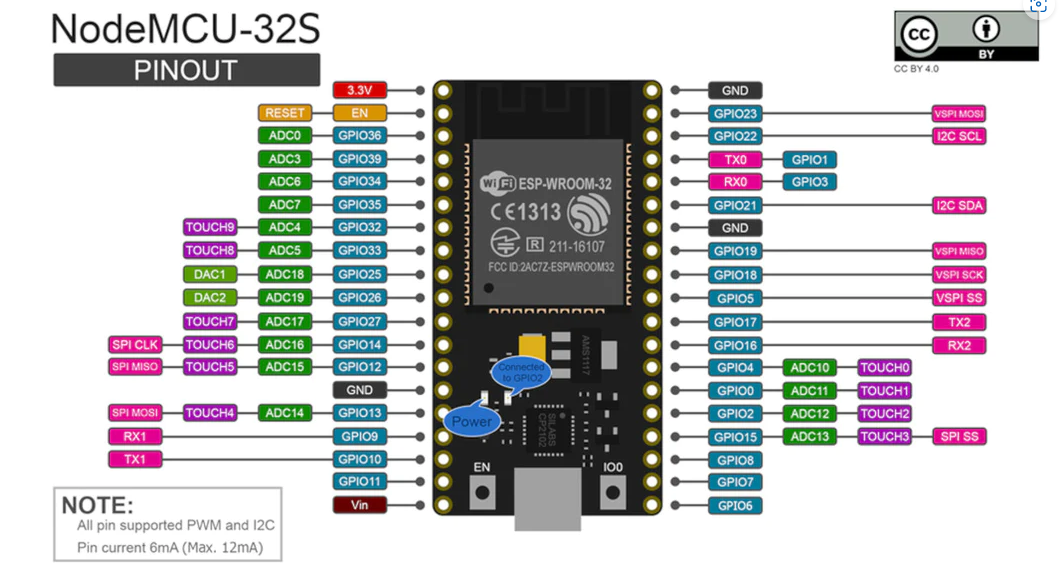
- Make the necessary connections for your project, such as GPIO pins, sensors, or actuators. Refer to the ESP-WROOM-32 datasheet for pin configurations.
Uploading the First Sketch
- Launch the Arduino IDE and create a new sketch.
- Go to "Tools" -> "Board" and select "ESP32 Dev Module" as the board.
- Choose the appropriate port under "Tools" -> "Port."
- Write your code using the Arduino programming language (C/C++).
- Click on the upload button (right-arrow symbol) to compile and upload the sketch to the ESP-WROOM-32 module.
- On the bottom right corner there will be a progress bar showing you how far it is in the process of compiling the code, once it's done, hold the reset button on your ESP-WROOM-32, when you see a percentage showing up on the serial monitor you can let go.
Wi-Fi and Bluetooth Programming
- To utilize Wi-Fi and Bluetooth capabilities, include the necessary libraries:
#include <WiFi.h>
#include <BluetoothSerial.h>
- Establish a Wi-Fi connection by providing the SSID and password:
const char* ssid = "YourWiFiSSID";
const char* password = "YourWiFiPassword";
void setup() {
    WiFi.begin(ssid, password);
    while (WiFi.status() != WL_CONNECTED) {
        delay(1000);
    }
    // Wi-Fi connected, do further operations.
}
- For Bluetooth, initialize the BluetoothSerial object and use the available methods:
BluetoothSerial SerialBT;
void setup() {
    SerialBT.begin("ESP32 Bluetooth");
    // Bluetooth operations here.
}
GPIO and Sensor Integration
- To control GPIO pins, use the
pinMode(),digitalWrite(), anddigitalRead()functions.
For example:
const int ledPin = 2;
void setup() {
    pinMode(ledPin, OUTPUT);
}
void loop() {
    digitalWrite(ledPin, HIGH);
    delay(1000);
    digitalWrite(ledPin, LOW);
    delay(1000);
}
-
To read analog sensors, use the
analogRead()function:const int sensorPin = 34;
void setup() {
// No setup needed for analog read.
}
void loop() {
int sensorValue = analogRead(sensorPin);
// Process sensor value.
}
Advanced Functionality
-
Web Server: Learn how to create a web server on the ESP32 to serve web pages, control devices, and retrieve sensor data.
-
OTA Updates: Explore Over-the-Air (OTA) updates to remotely update your ESP-WROOM-32 firmware without physically connecting to it.
Troubleshooting
-
Serial Monitor: Use the Serial Monitor in the Arduino IDE (navigate to "Tools" > "Serial Monitor") to debug and monitor your ESP-WROOM-32 board. Check for any error messages or unexpected output.
-
Check Connections: Double-check your hardware connections to ensure they are correct and properly seated.
-
Internet Resources: Utilize online forums, tutorials, and documentation to troubleshoot specific issues or error messages you encounter during your project.
Conclusion
In this tutorial, you learned the basics of setting up the development environment, making hardware connections, uploading sketches, and exploring Wi-Fi, Bluetooth, GPIO, and sensor integration with the ESP-WROOM-32 board. With this knowledge, you can start building your own IoT projects and leverage the extensive capabilities of the ESP32 microcontroller. Happy tinkering!