TinkerKit Arduino LCD - Introduction
With the TinkerKit LCD module you can write text on the module’s screen in a few minutes. It has an LCD display on board and it requires a dedicated software library that is available here. The LCD can be used like a regular module by plugging it into the TinkerKit! shield or as an independent component; it has in fact a microcontroller and a USB port on board that make it a fully-fledged LCD-shaped Arduino Leonardo.
Serial Connection
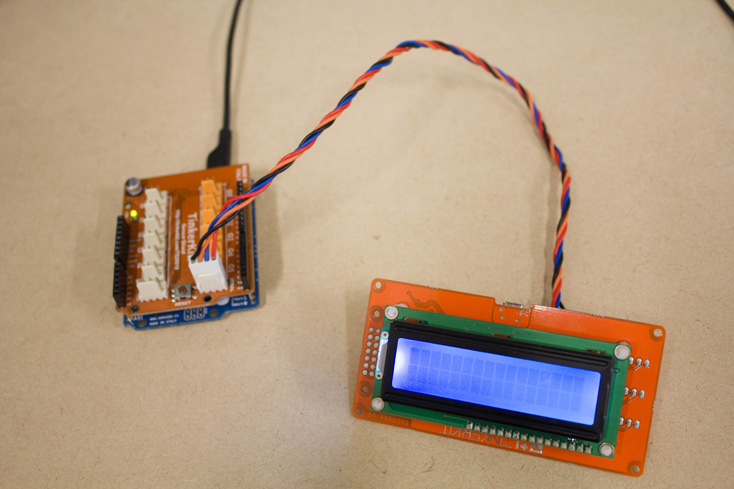
Using a four-connectors wire or 4-pin jumper wire (Molex KK 2.54mm), the LCD module can be hooked-up to the SERIAL port on the TinkerKit! Shield. To work properly it has to be loaded with the right firmware; it is nothing more than a particular Arduino sketch and it’s located inside the examples of the TKLCD library. You can open it from File->Examples->TKLCD->SerialFirmware. Mind that this firmware must be uploaded on the LCD module, and not on an Arduino. Connect the module using the USB cable, (the Arduino software recognizes it as an Arduino Leonardo) then load the firmware. You don’t have to upload the firmware every time, just remember to reload it if you upload something else on the module, and then you want to use it again from the serial. Once the firmware is uploaded and the module is connected to the Serial port, open the Arduino software and include the following libraries:TKLCD, LiquidCrystal and Wire. The TKLCD library has two different classes, one for each use; in our case, we are using it via serial port so we have to declare it as TKLCD_Serial in the globals (before the setup()):
TKLCD_Serial lcd = TKLCD_Serial();
Stand-alone
One of the cool features of the LCD module is that it doesn’t need an Arduino or TinkerKit! shield to run. It can be connected straight to the USB port of your computer exactly like an Arduino Leonardo, then, once the code is finished, just select “Arduino Leonardo” from the board’s list and upload. To control the LCD we have to include the following libraries: TKLCD, LiquidCrystal and Wire, then declare the LCD as TKLCD_Local in the globals (before the setup()):
TKLCD_Local lcd = TKLCD_Local();
Now we have to initialize it in the setup():
lcd.begin();
From now on we have a series of methods that we can apply to the lcd object it inside the loop function. Just browse into the examples folder of the TKLCD library or read the library’s reference to see all of them.
Try with:
lcd.print("Hello!");
The TinkerKit! LCD module mounts nine connectors on the board. Six of these, the ones with the three-pins layout, can be used with other TinkerKit! modules. Don’t be confused by the labels, the A0, A1 and A2 are analog inputs and D5, D6 and D11 are outputs but they can also be used as digital inputs. Use them like regular inputs and outputs, just remember to include the TinkerKit! library in addition to the TKLCD and to declare them using the right port:
TKLed led(D1);
In the following sketch we use the LCD module to display the temperature. We use it as a stand-alone module with a thermistor connected directly to one of its input ports.
Example
#include <TinkerKit.h>
#include <matrix_lcd_commands.h>
#include <TKLCD.h>
#include <LiquidCrystal.h>
#include <Wire.h>

TKLCD_Local lcd = TKLCD_Local();
TKThermistor therm(A0);

void setup()
{
  lcd.begin();
}

void loop()
{
  int temp = therm.readCelsius();

  lcd.clear();
  lcd.print("Temp: ");
  lcd.print(temp);
  delay(200);
}