BIPES Tutorial for ESP32
This tutorial will cover the basics of using BIPES (Block-based Integrated Platform for Embedded Systems) with an ESP32 microcontroller.
Installing the MicroPython Firmware
First, you will need to install the MicroPython firmware onto your ESP32:
-
Connect your ESP32 to your computer with a cable capable of data transfer.
-
Open https://bipes.net.br/flash/esp-web-tools/ in a browser that supports Web Serial.
Valid Browsers: Google Chrome, Microsoft Edge
Invalid Browsers: Safari -
Click the blue CONNECT button. This will open up a serial port selection menu.
-
Select the port that ends with (cu.usbserial-0001). Then a Device Dashboard menu will open.
-
Click INSTALL MICROPYTHON 1.17.
-
Click INSTALL WHILE holding down the boot button on your ESP32.
The ESP32 used for this tutorial had its boot button indicated by "100", but yours may differ.You can LET GO of the button when you see "Erasing...".
-
Wait for installation to complete.
Accessing BIPES
Now that the MicroPython firmware has been installed on your ESP32, we will move on to accessing BIPES.
Online Access
For browser-based online access, simply open up https://bipes.net.br/ide/ in a browser that supports Web Serial.
Offline Access
For browser-based offline access:
-
Navigate to this GitHub repo: https://github.com/carobot/BIPES-offline
-
Click the green Code button and select Download ZIP.
This will download a copy of the repository locally. The downloaded folder should be titled BIPES-offline-master. -
Locate the file BIPES-offline-master/ui/index_offline.html.
-
Open index_offline.html in a browser that supports Web Serial.
This file will work offline.
Blinky Project
Now that we have access to BIPES, we will build a basic LED blinking project with the ESP32.
-
Access BIPES in a browser that supports Web Serial.
-
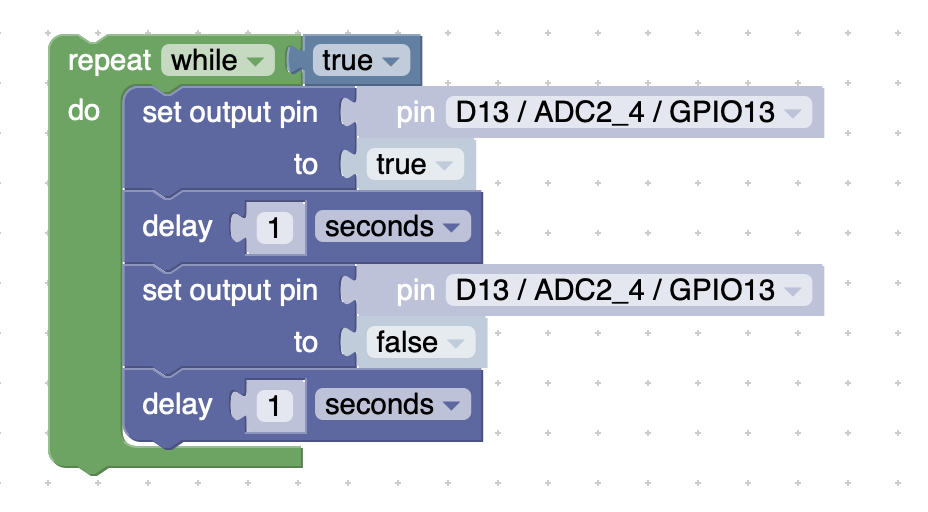
Create the following program using blocks from the toolbox on the left of the BIPES interface:

- The "while" block can be found in Loops.
- The "true" block can be found in Logic.
- The "set output pin" blocks can be found in Machine > In/Out Pins.
- The "delay" blocks can be found in Timing.
-
Select a pin for the "set output pin" block to control.
The example uses pin 13, but almost any pin works. Some pins on the ESP32 will not be listed as an option. -
Wire an LED to the ESP32 using a breadboard. The selected pin should connect to the anode (long leg) of the LED.
-
Connect your ESP32 to your computer using a cable capable of data transfer.
-
Look to the top bar of the BIPES interface.
-
Click the plug icon besides the serial connection icon and select the port that ends with (cu.usbserial-0001).
-
Then look beside the plug icon and ensure ESP32 is selected in the board seleciton area.
-
Click the play button to send the program to the ESP32.
If everything is wired correctly, then your LED should blink in 1 second intervals!
This is the end of this tutorial. You should now know the basics of using BIPES for an ESP32.
Now, go and explore the more blocks to make more complex programs!