BIPES Tutorial for Arduino Uno
This tutorial will cover the basics of using BIPES (Block-based Integrated Platform for Embedded Systems) with an Arduino Uno microcontroller.
Installing Snek Lang Firmware
First, you will need to install the Snek Lang firmware onto your Arduino Uno:
-
Connect your Arduino Uno to your computer with a cable capable of data transfer.
-
Open https://bipes.net.br/snek-web-uploader/ in a browser that supports Web Serial.
Valid Browsers: Google Chrome, Microsoft Edge
Invalid Browsers: Safari -
Click the button labeled "Upload Blink to nano/uno/pro/pro-mini to test if the board is connected correctly. When prompted, click the serial port connected to the Arduino Uno. You should see an LED on the Arduino blink in 1 second intervals
-
After verifying your connection, click the button labeled "Upload Snek to nano/uno/pro/pro-mini []" to upload the firmware to your arduino.
-
The setup is finished! Now you can head to BIPES and start testing!
Accessing BIPES
Now that the Snek Lang firmware has been installed on your Arduino, we will move on to accessing BIPES.
Online Access
For browser-based online access, simply open up https://bipes.net.br/ide/ in a browser that supports Web Serial.
Offline Access
For browser-based offline access:
-
Navigate to this GitHub repo: https://github.com/carobot/BIPES-offline
-
Click the green Code button and select Download ZIP.
This will download a copy of the repository locally. The downloaded folder should be titled BIPES-offline-master. -
Locate the file BIPES-offline-master/ui/index_offline.html.
-
Open index_offline.html in a browser that supports Web Serial.
This file will work offline.
Blinky Project
Now that the setup is complete, let's try to blink an LED using BIPES on our Arduino Uno!
-
Open BIPES on your computer.
-
Create the following program using blocks from the toolbox on the left of the BIPES interface:
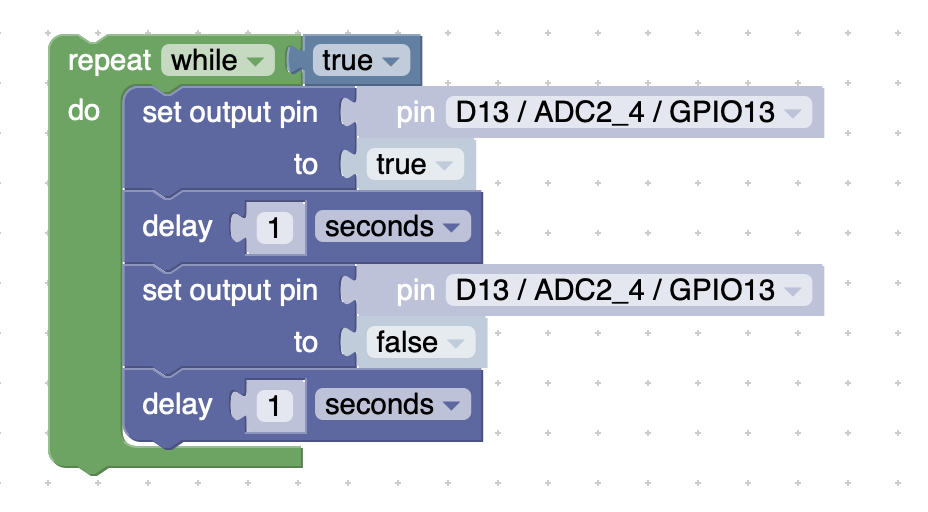
- The "while" block can be found in Loops.
- The "true" block can be found in Logic.
- The "set output pin" blocks can be found in Machine > In/Out Pins.
- The "delay" blocks can be found in Timing.
-
However, instead of using the delay block, you should see a block labeled "Snek: delay seconds". Use this block instead. Additionally, instead of pin D13, which is an ESP32 pin, pick the pin labeled LED/D13.
-
Connect the Arduino Uno to your computer using a cable capable of data transfer.
-
Click the plug icon on the top bar and select the correct serial port.
-
Right next to the plug icon, select "Arduino UNO or MEGA (Snek @38400)
-
Click the run button to send the code to your Arduino
-
If done correctly, you should see an LED on your Arduino board blink in 1 second intervals.
-
If you want, you can wire an LED the same way you did for the ESP32 tutorial and blink the external LED instead.
This is the end of this tutorial. You should now know the basics of using BIPES for an Arduino Uno.
Now, go and explore the more blocks to make more complex programs!