Getting Started - Arduino IDE
In order to get your Arduino up and running, you’ll need to download the Arduino IDE (Integrated Development Environment). It will allow you to program the Arduino to do exactly what you want. It’s an editor for writing programs.
1. Download the IDE
Depending on the OS (Operating System) you have, download the latest IDE (not the BETA) under “download” in the middle of the page.
2. Connect your Arduino to your Computer
Use the USB A-to-B cable provided (or any other USB A-to-B cable) to connect the Arduino to one of your computer’s USB inputs.
3. Install Drivers
| Platform | Driver |
|---|---|
 | Windows will try to install a driver for the Arduino by itself but the process with fail. That’s alright because Windows don’t have the Arduino driver. To install the driver, you’ll have to manually find it for Windows. Go to the following web address for more instruction: http://arduino.cc/en/Guide/Windows |
| No driver is needed. But you can still go to the following web address for more details: http://arduino.cc/en/Guide/MacOSX | |
 | Go to the following web address for more instructions: http://arduino.cc/en/Guide/Linux |
4. Open the Arduino IDE
Open the Arduino IDE software on your computer, arduino.exe, in the folder where you installed the Arduino software. Get familiar with the interface because this is where you are going to write the code for your Arduino project.
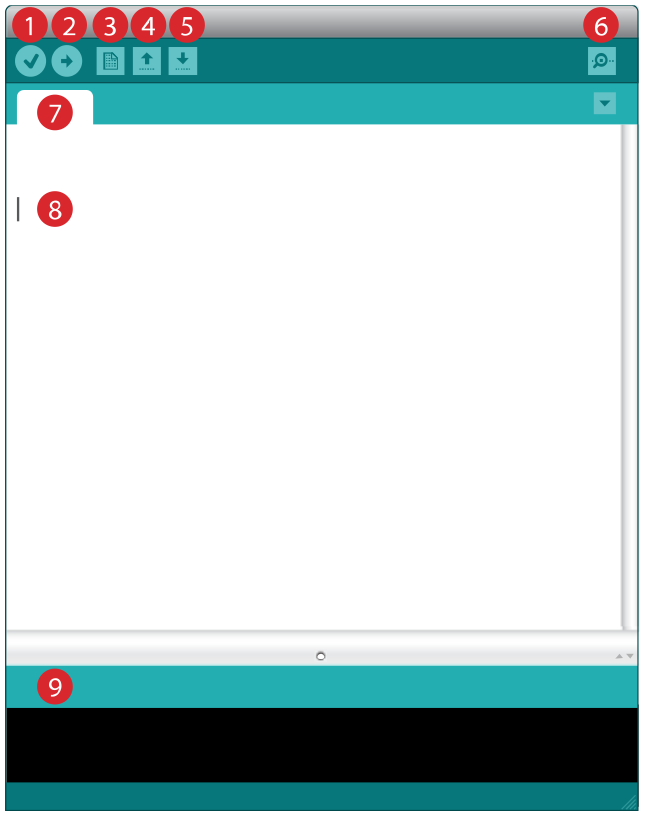
Important Command
| Open | Verify | Upload |
|---|---|---|
 |  |  |
| Label | Description |
|---|---|
| Verify: Compiles and approves your code. It will catch errors in syntax (like missing semi-colons or parenthesis). | |
| Upload: Sends your code to the Arduino board. When you click it, you should see the lights on your board blink rapidly. | |
| New: This buttons opens up a new code window tab. | |
| Open: This button will let you open up an existing sketch. | |
| Save: This saves the currently active sketch. | |
| Serial Monitor: This will open a window that displays any serial information your Arduino is transmitting. It is very useful for debugging. | |
| Sketch Name: This shows the name of the sketch you are currently working on. | |
| Code Area: This is the area where you compose the code for your sketch. | |
| Message Area: This is where the IDE tells you if there were any errors in your code. |
5. Identify the Arduino Board
But before you can upload any code, you have to setup your IDE to identify your Arduino Uno.
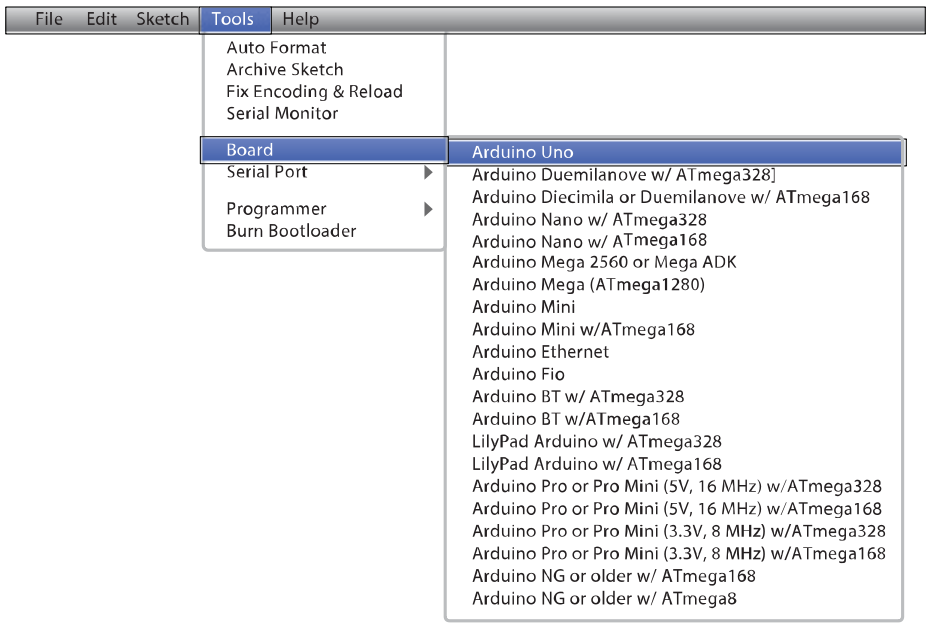
First, select which type of Arduino board. For our case, select Arduino Uno. If you are using another board, select it here.
Then select the serial port that the Arduino is connected to:
| Platform | Port | |
|---|---|---|
| Select the serial device of the Arduino board from the Tools > Serial Port menu. This is likely to be COM3 or higher (COM1 and COM2 are usually reserved for hardware serial ports). To find out, you can disconnect your Arduino board and re-open the menu; the entry that disappears should be the Arduino board. Reconnect the board and select that serial port. |  |
| Select the serial device of the Arduino board from the Tools > Serial Port menu. On the Mac, this should be something with /dev/tty.usbmodem (for the Uno or Mega 2560) or /dev/tty.usbserial (for older boards) in it. |  | |
| Go to the following web address for more instructions: http://arduino.cc/en/Guide/Linux |
There are three main steps to any Arduino project:
| Step 1 | Step 2 | Step 3 |
|---|---|---|
| ASSEMBLE The circuit | WRITE The code | UPLOAD & RUN See it work! |
6. Setup the Arduino and Breadboard Holder and Start Building
Now that you’ve identified the Arduino for the IDE, you are ready to have some fun.

NOTE: Line-up the text of the breadboard as shown in the diagram above so you can follow this guidebook easier.
 | 5V Electricity. Your Arduino runs on five volts. This is the power that will be supplied from your computer via USB and will be the driving force behind any components you use in your circuits. By plugging your Arduino board into your computer, you are supplying it with just the right voltage it needs to thrive! 5V can’t hurt you, so don’t be afraid to touch anything in your circuit. |
| Prev | Next |
|---|---|
| Getting Started – Arduino Uno and Hardware | Circuit 01 – Blinking a LED |