Getting Started – Arduino Uno and Hardware
First, let’s understand a bit more about the Arduino Uno and some of the components of this kit. The header pins are one of the most important parts for putting our example circuits together. Take a moment and locate the input/output ports of your Arduino Uno.
Arduino Uno

| Label | Description |
|---|---|
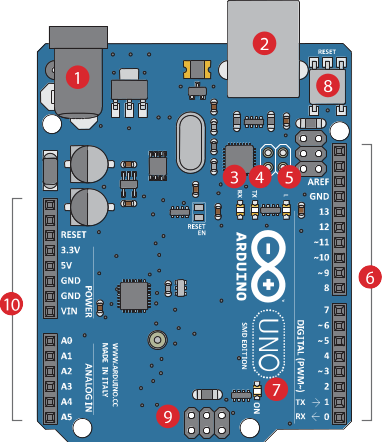
| Power In (5.5x2.1mm Barrel Jack) - Can be used with either a 9V-12V wall-wart or battery. | |
| Power In (USB Port) - Provides power and communicates with your board when plugged into your computer via USB. | |
| LED (RX: Receiving) - This shows when the Arduino is receiving data (such as when being programmed). | |
| LED (TX: Transmitting) - This shows when your Arduino is transmitting data (such as when running a program). | |
| LED (Pin 13: Troubleshooting) - This LED is incorporated into your sketch to show if your program is running properly. | |
| Pins (ARef, Ground, Digital, Rx, Tx) - These various pins can be used for inputs, outputs, power, and ground. Pins 3, 5, 6, 9, 10, and 11 - These six digital pins can be programmed for analog output. The details on how to use these pins are discussed more in Project #4. | |
| LED (Indicates Arduino is ON) - This is a simple power indicator LED. | |
| Reset Button - This is a way to manually reset your Arduino, which makes your code restart. | |
| ICSP Pins (Uploading Code without Bootloader) - This is for "In-Circuit Serial Programming," used if you want to bypass the boot loader. | |
| Pins (Analog In, Power In, Ground, Power Out, Reset) - These various pins can be used for inputs, outputs, power, and ground. |

Breadboard

| Label | Description |
|---|---|
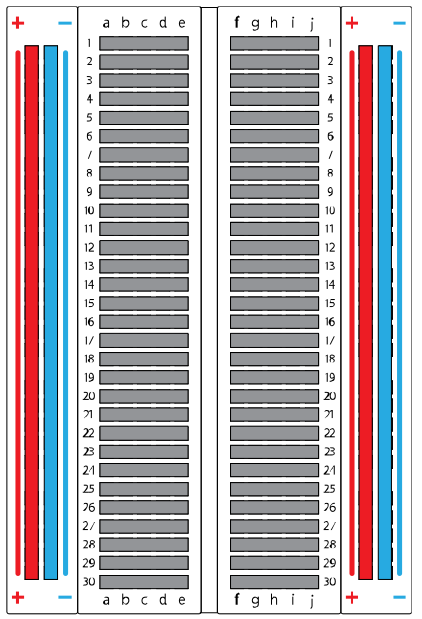
| Power Rail - Each + sign runs power anywhere in the vertical column. | |
| Ground Rail - Each - sign runs to ground anywhere in the vertical column. | |
| Horizontal Rows - Each of these rows numbered 1-30 are comprised of five horizontal sockets. Components placed in the same row will be connected in a circuit when power is running. For example, “a1” is connected to “e1” but not connected to “f1”, “a2” or “f2”. |
| Prev | Next |
|---|---|
| Introduction - What is Arduino? | Getting Started - Arduino IDE |